Quick No-Bake Chocolate Peanut Butter Swirl Fudge: Your Easiest Indulgence Yet
Craving a rich, decadent treat that requires zero oven time and minimal effort? Look no further than this incredible Quick No-Bake Chocolate Peanut Butter Swirl Fudge. It’s the ultimate dessert for anyone who loves the classic pairing of chocolate and peanut butter, offering that beloved candy bar flavor in an elegant, melt-in-your-mouth fudge form. Perfect for last-minute gifts, holiday platters, or simply satisfying a sweet tooth, this recipe proves that delicious doesn't have to be complicated.
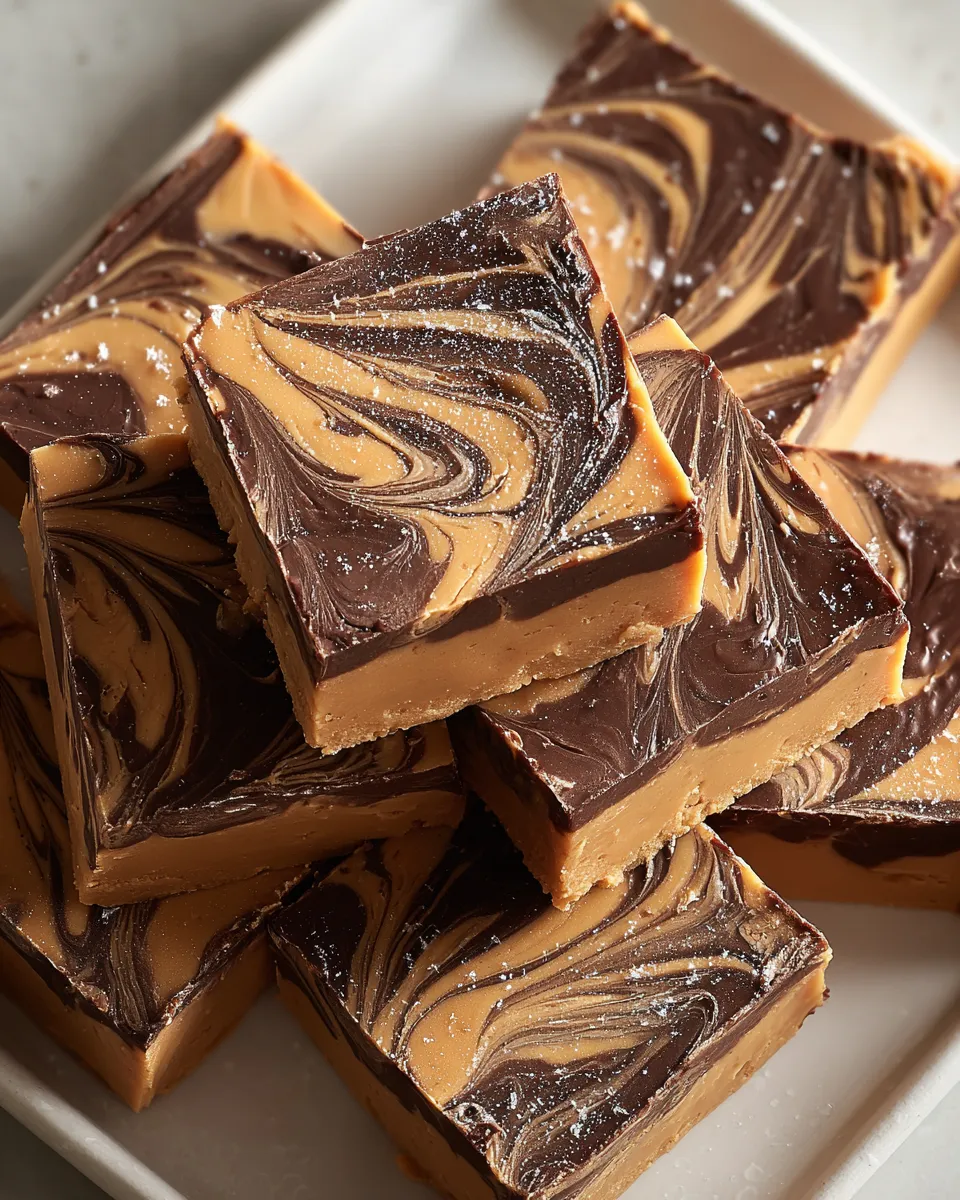
Imagine a velvety smooth fudge, boasting a deep chocolate base generously swirled with creamy, salty-sweet peanut butter. Each bite delivers a harmonious blend of flavors and textures, reminiscent of your favorite peanut butter cup, but with an elevated, homemade touch. Best of all, it comes together with just four simple ingredients and less than 20 minutes of active preparation. No candy thermometers, no complex techniques – just pure, unadulterated fudge perfection waiting to be chilled and enjoyed.
Why This No-Bake Fudge Will Become Your Go-To Recipe
There are countless reasons to fall in love with this Foolproof 4-Ingredient Chocolate Peanut Butter Fudge. Its undeniable appeal lies in its simplicity and spectacular results, making it a standout in the world of homemade confections:
- Effortlessly Quick & Foolproof: Say goodbye to baking anxieties! This recipe is designed for success, even for beginner home cooks. With active prep time clocking in under 20 minutes, you can whip up a batch on a whim. The "no-bake" nature eliminates guesswork, allowing you to focus on the fun part – melting, swirling, and anticipating that first bite.
- Luxuriously Rich & Creamy Texture: The magic of sweetened condensed milk combined with quality chocolate chips creates a fudge that is wonderfully silky, smooth, and melts beautifully in your mouth. The contrast between the firm, yet yielding, chocolate and the soft peanut butter swirl is simply divine, ensuring a truly satisfying chew and dissolve.
- A Perfect Flavor Duet: The balance of robust semi-sweet chocolate and the distinctive salty-sweet notes of peanut butter is a classic for a reason. This fudge masterfully captures that quintessential flavor profile, ensuring neither ingredient overpowers the other, but rather enhances the overall experience.
- Ideal for Sharing & Gifting: This recipe yields approximately 32 squares, making it an excellent candidate for gifting or serving at gatherings. Whether you're filling decorative candy tins, packing festive cellophane bags for stocking stuffers, or simply arranging them on a platter for a party, this fudge makes an impressive homemade statement. For more ideas on how to present your treats, check out Easy Holiday Gifting: Chocolate Peanut Butter Swirl Fudge.
- No Special Equipment Needed: Forget about fancy stand mixers or temperamental candy thermometers. A microwave (or stovetop and double boiler), a couple of bowls, and an 8x8-inch pan are all you need to bring this delightful creation to life.
Gathering Your Simple Ingredients for Irresistible Fudge
The beauty of this chocolate peanut butter swirl fudge lies in its reliance on common pantry staples. High-quality ingredients are key to unlocking the best flavor and texture, so choose wisely!
What You'll Need:
- 2 cups (approx. 12 ounces) Semisweet Chocolate Chips: This forms the delicious base of your fudge. While any brand works, opting for high-quality chocolate chips like Ghirardelli or Guittard will significantly elevate the flavor profile. Better chocolate melts smoother and provides a richer, less waxy mouthfeel.
- 4 tablespoons Salted Butter, Divided: Butter adds richness and helps create that luxurious, smooth texture. Using salted butter is a secret weapon here, as the touch of salt expertly balances the sweetness of the other ingredients, enhancing the overall flavor without making the fudge taste overtly salty.
- 1 can (14 ounces) Sweetened Condensed Milk, Divided: This is the magical binding agent and primary sweetener for no-bake fudge. It provides the necessary creamy consistency and firmness once chilled. Ensure you're using *sweetened condensed milk*, not evaporated milk, as they are very different products.
- ½ cup (approx. 3.5 ounces) Peanut Butter Baking Chips: These chips are specifically designed to melt smoothly and integrate well into baked goods. Reese's or other store brands work wonderfully.
Ingredient Notes & Easy Substitutions:
- Chocolate Chip Varieties: Feel free to experiment with different types of chocolate. Dark chocolate chips will yield a richer, less sweet fudge, while milk chocolate chips will make it extra creamy and sweeter.
- Peanut Butter Chips vs. Creamy Peanut Butter: If peanut butter baking chips aren't available, you can absolutely substitute with ½ cup of creamy peanut butter. Important: Stick to traditional creamy peanut butter (like Jif or Skippy) and avoid natural peanut butter, as its oil separation can lead to an oily, less stable fudge.
- Dairy-Free Option: This recipe is surprisingly adaptable for dairy-free diets! Simply swap the salted butter for a plant-based butter alternative, use your favorite vegan chocolate chips, and opt for sweetened condensed coconut milk. The result is just as delicious.
- No Microwave? No Problem!: While the microwave makes this recipe incredibly quick, you can easily melt your ingredients using a double boiler. Place heat-safe bowls over simmering water, stirring gently until smooth and fully melted. Alternatively, melt them in separate saucepans over very low heat, stirring constantly to prevent scorching.
Mastering the No-Bake Method: Step-by-Step for Perfect Swirl Fudge
The beauty of this chocolate peanut butter swirl fudge lies in its straightforward process. Follow these simple steps for a truly show-stopping treat:
- Prep Your Pan: Begin by lightly greasing an 8x8-inch square pan with butter or shortening. For easier removal and cleaner cuts later, you can also line the pan with parchment paper, leaving an overhang on two sides to create "handles." This makes lifting the set fudge out of the pan a breeze.
- Melt the Chocolate Base: In a large, microwave-safe bowl, combine your 2 cups of semisweet chocolate chips with 2 tablespoons of the salted butter and 1 cup of the sweetened condensed milk. Microwave the mixture in short bursts – typically 30-second intervals – stirring thoroughly after each interval. Continue this process until the mixture is completely smooth, glossy, and free of any lumps. This usually takes around 1 minute 30 seconds to 2 minutes total, depending on your microwave's power. Be careful not to overheat the chocolate, as this can make it seize.
- Melt the Peanut Butter Swirl: In a separate, smaller microwave-safe bowl, combine the ½ cup of peanut butter baking chips (or creamy peanut butter) with the remaining 2 tablespoons of salted butter and the remaining ½ cup of sweetened condensed milk. Microwave using the same 30-second interval method, stirring well after each, until the peanut butter mixture is smooth and easily stirrable. This typically takes about 1 minute.
- Layer and Swirl Your Masterpiece: Pour the entire chocolate mixture evenly into your prepared 8x8-inch pan. Now, with a spoon, dollop spoonfuls of the peanut butter mixture randomly over the chocolate base. Once the peanut butter is distributed, take a butter knife or a skewer and gently swirl it through both layers. Create elegant S-shapes, figure-eights, or simple zig-zags – the goal is to create beautiful marbling without fully blending the two distinct colors. Don't over-swirl, or you'll lose the contrast!
- Chill and Cut to Enjoy: Once your swirl is perfected, transfer the pan to the refrigerator. Allow the fudge to chill for at least 2 hours, or until it is completely firm and set. This is a crucial step for achieving that ideal fudge texture. Once firm, use the parchment paper handles (if used) to lift the fudge from the pan onto a cutting board. For clean, sharp squares, use a large, sharp knife. You can warm the knife under hot water and wipe it dry between cuts for even smoother edges. Cut into approximately 32 bite-sized squares.
Tips for the Perfect Swirl, Storage, and Gifting
Achieving a beautiful swirl and ensuring your chocolate peanut butter swirl fudge lasts are key to enjoying this treat to its fullest.
Crafting the Ideal Swirl:
- Don't Overdo It: The biggest mistake people make with swirling is overmixing. A few gentle passes with a knife or skewer are all you need to create distinct ribbons and patterns. Too much swirling will result in a muddy, uniform color.
- Temperature Matters: Ensure both the chocolate and peanut butter mixtures are warm and fluid when you pour and swirl. If they cool too much, they'll be harder to work with and won't blend as beautifully.
- Vary Your Technique: Experiment with different swirling motions. A simple back-and-forth zig-zag, a circular motion with a few figure-eights, or even just dragging the knife through in random patterns can create unique and stunning designs.
Storage and Shelf Life:
- Room Temperature: This fudge can be stored in an airtight container at room temperature for up to 1 week. If your kitchen is particularly warm, consider refrigeration.
- Refrigeration: For a firmer fudge and extended freshness, store it in an airtight container in the refrigerator for up to 2-3 weeks. Allow it to come to room temperature for a few minutes before serving for optimal texture.
- Freezing for Future Cravings: Fudge freezes exceptionally well! Wrap individual squares or small blocks tightly in plastic wrap, then place them in a freezer-safe bag or container. It will keep in the freezer for up to 3 months. Thaw at room temperature for several hours or overnight in the refrigerator before serving.
Gifting and Presentation Ideas:
- Cute Packaging: Arrange squares of fudge in decorative tins, small boxes lined with parchment, or clear cellophane bags tied with festive ribbons.
- Mini Cupcake Liners: Place individual squares in mini paper cupcake liners for an elegant presentation and easy handling, especially for parties.
- Assorted Platters: Combine this fudge with other no-bake treats, cookies, or truffles for a beautiful and varied holiday dessert platter.
Indulge in Homemade Bliss
This Quick No-Bake Chocolate Peanut Butter Swirl Fudge is more than just a recipe; it's an invitation to effortlessly create a moment of pure indulgence. Its quick preparation, simple ingredients, and unbelievably rich flavor make it a true kitchen hero for any occasion. Whether you're a seasoned baker or a complete novice, you'll be amazed at how easily you can achieve such professional-looking and tasting results. So go ahead, treat yourself, share the joy, and let this delightful fudge become a new favorite in your culinary repertoire!
